August 12, 2022
By Chris “The Drone Geek” Fravel
If you love drones and have spent any length of time on the internet, then you have seen a ton of articles encouraging you to buy a drone, instructing you on how to take the Part 107 tests, and the best drones for beginners. However, many of us (myself included) tasked with the job of writing and creating content that can help the drone pilot community have failed to start at the root of these journeys and what is arguably the most important issue to address for anyone looking to get into the hobby/profession: How does one fly a drone?
Learning to fly a drone can be a daunting task, but it really boils down to this: a remote pilot is stationed at the place where the drone is launched and landed (known as the home point) where they use either an analog or digital remote controller to manipulate the movement and speed of their unmanned aerial vehicle. While reductionism can make the explanation that simple, there are other things to know if you want to separate yourself from other drone pilots and get the most out of your unmanned aerial vehicle (UAV). This article will go over the principles for not only flying a drone, but how to fly it well.
UNDERSTANDING DIMENSIONAL PHYSICS AND MOVEMENT
It’s easy to overlook this part of the equation. In most cases, people are satisfied with the idea that when the drone turns on, it’s just a matter of using the sticks to move it where you want it. That’s not totally untrue, but we should seek to understand as much as we can about anything we try to do in life – drones are no exception. How does it move? Why does it move? What makes it move this way? What makes it move that way? There are tons of questions we should be asking, but largely do not. Let’s dive into the finer points…
Pitch, Roll, and Yaw (oh, and Throttle too)…
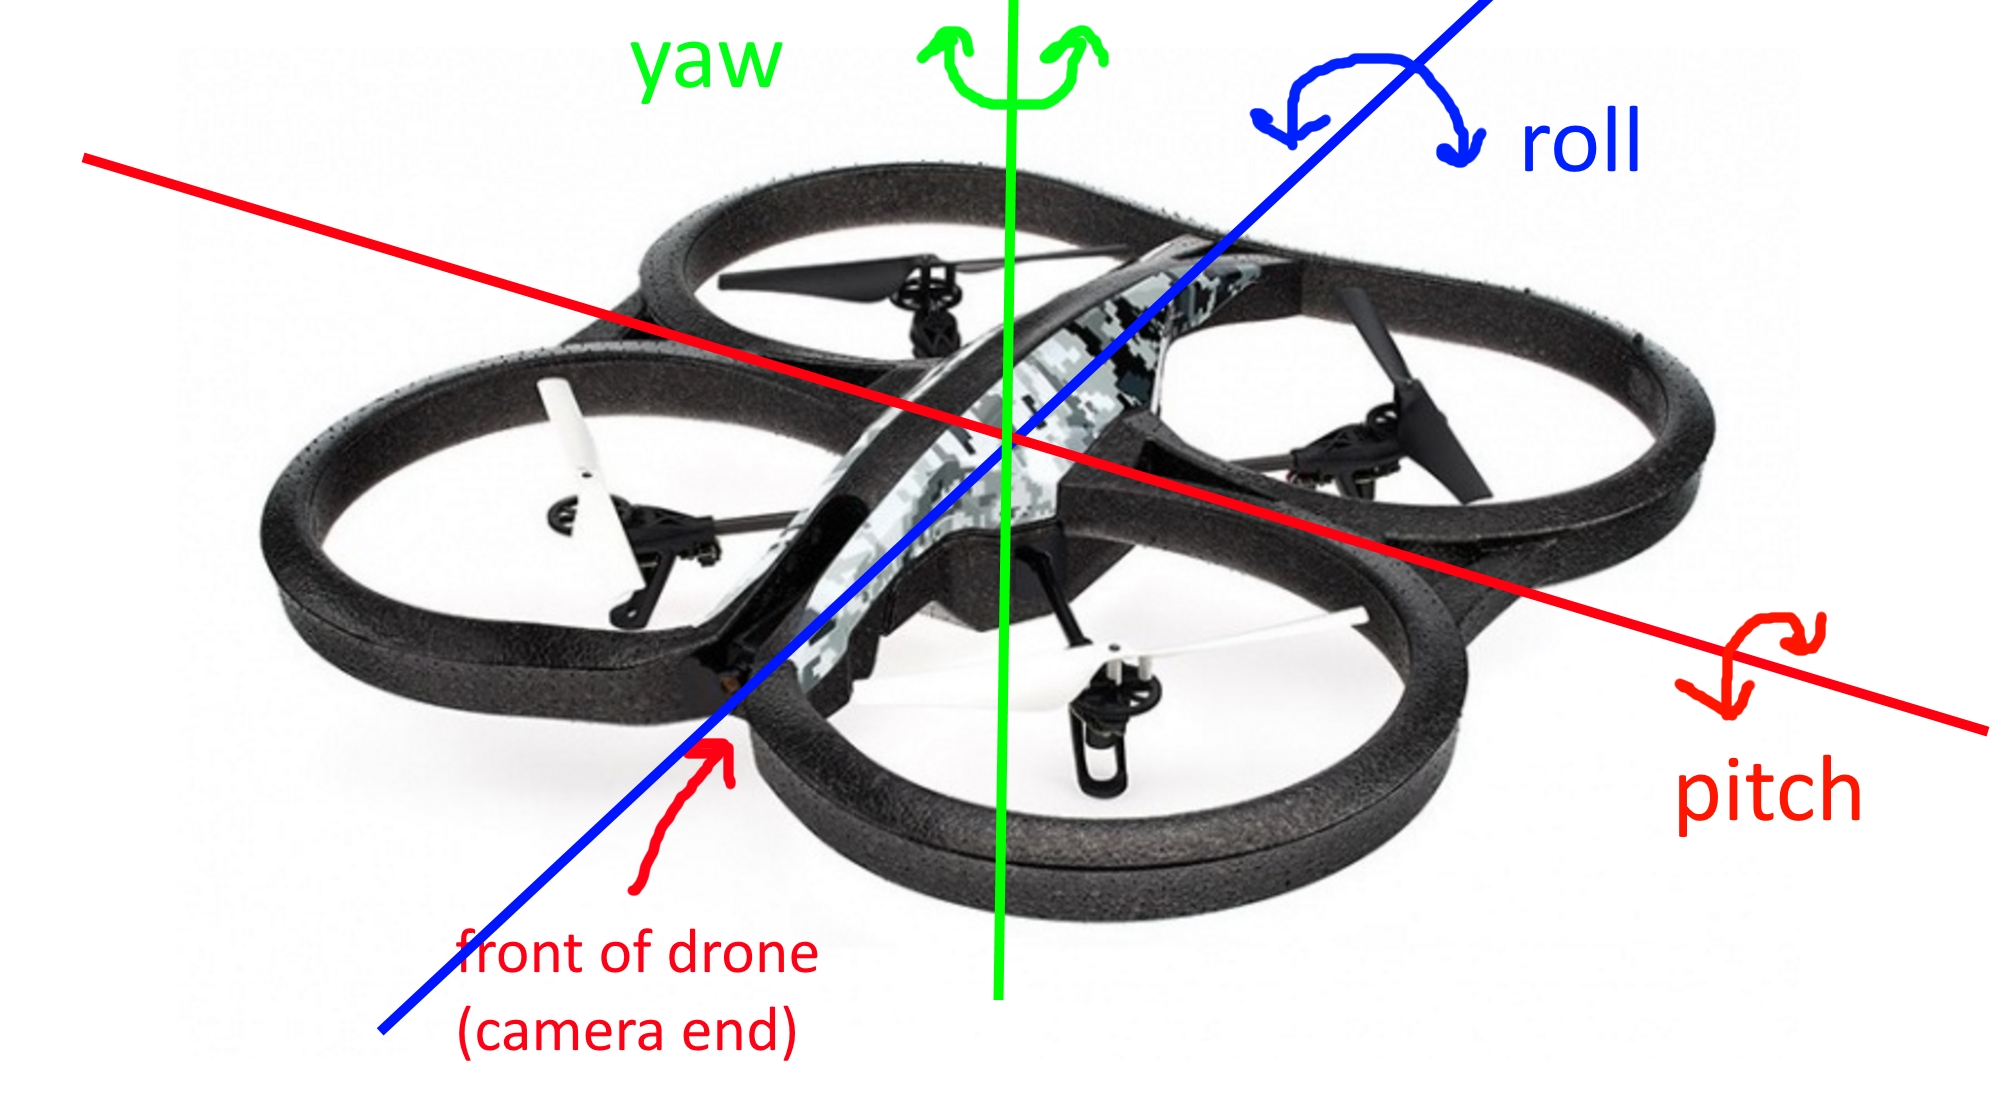
There are three types of movement a drone can make which are pitch, roll, and yaw. Using these three movements separately or in cohesion with one another is how we as pilots move the drone the way we need to move it to achieve our goals and the goals of our missions. Imagine drawing three lines through your drone: one line is from the left side to the right, another is from the nose of the aircraft to the tail, and the final line goes through the top of the aircraft and comes out through the underbelly. Now, let’s give those lines nomenclature and purpose:
Pitch is the line that spans from the left side of the aircraft to the right. Now, imagine taking the aircraft on this line and rotating it forward and/or backward along the perpendicular of the line. This would cause the aircraft’s nose to either dip forward or rear backward and the tail vice versa. This angular movement causes the aircraft to either move forward or backward.
Roll is the line that spans from the nose of the aircraft to the tail. Also imagine taking the aircraft on this line and rotating it either left or right along the perpendicular of the line. This would cause the aircraft to either lean to the left or lean to the right. This angular movement causes the aircraft to either move left or right.
Yaw is the line that spans from the top of the aircraft down through the underbelly. Imagine taking the aircraft on this line and rotating it left or right along the perpendicular of the line. This would cause the aircraft to spin a 360-degree motion in one direction or another. This angular movement causes the aircraft to either turn left or right.
Throttle is what influences the amount of thrust generated by your UAV. When the throttle is increased, the motors and propellers on your aircraft generate more thrust which causes the drone to move faster and/or higher. When the throttle is decreased, the motors and propellers on your aircraft generate less thrust which causes your drone to come back down closer to the ground and/or move at a steadier pace.
A quick note about throttle as it relates to RTF-GPS drones versus freestyle/manually piloted drones: In RTF-GPS drones such as your Mavics, EVOs, Phantoms, Airs, and more the “throttle input” actually controls elevation of the drone. In freestyle or manually-piloted drones the throttle controls the amount of thrust that the motors and propellers generate.
Now that you know about pitch, roll, and yaw (don’t forget about throttle), let’s talk about how they work together and what that looks like on your typical RTF-GPS drone controller.
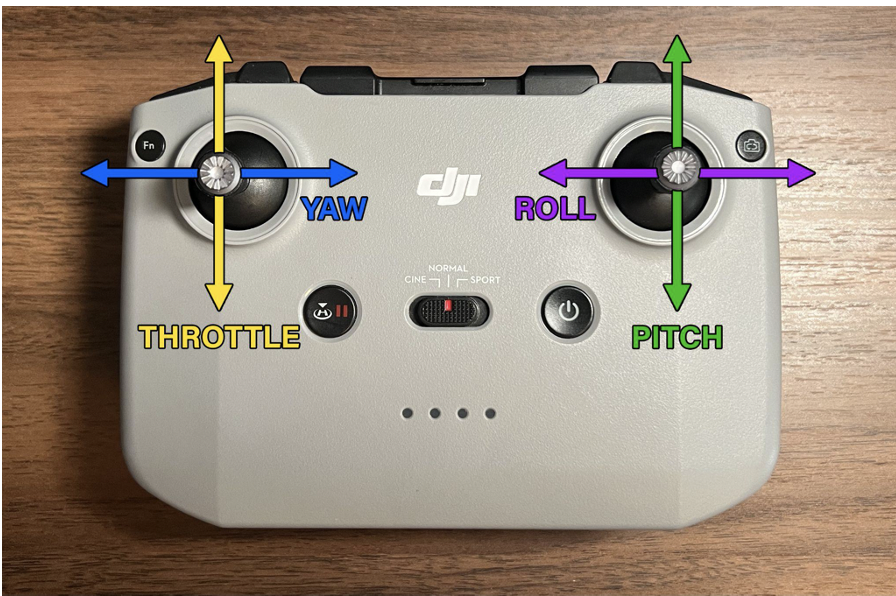
In the photo above you will see the DJI RC-N1 controller - stock with DJI’s most recent consumer/prosumer drones starting with the DJI Mini 2 to every drone produced after that as of the writing of this article. This controller, like many others, has two joysticks on either side and a variety of buttons across the face and top of it. We won’t get into the nuances of the buttons in this article as each manufacturer has different programming and functionality as well as placement for the buttons on their controllers. However, almost all major drone manufacturers defer to this stick layout.
On the left joystick you control the throttle and yaw. When you push the joystick up and down you increase and decrease the throttle respectively, which causes the drone to either gain or lose elevation. Remember, this does not work exactly the same way in freestyle or manually-piloted drones, where instead the throttle influences the amount of thrust generated by the motors which, in-turn, makes your drone go faster or slower as well as higher or lower (depending upon the other inputs on the controller).
When you push the left joystick from side-to-side you control the yaw of the drone. This will turn your drone on a 360-degree axis in any direction you want without moving it in three-dimensional space. This is great for capturing pan shots across a wide landscape.
On the right joystick you control the pitch and the roll. When you push the joystick up and down you create a forward and backward pitch respectively. When you pitch the drone forward, it will move forward in a straight line if no other input is given through the remote controller. Inversely, when you pitch the drone backward, it will move backward in a straight line with the same stipulations stated prior.
When you push the right joystick from side-to-side you control the roll of the drone. This will tilt your drone left or right, causing a strafe motion in the aircraft. The drone will face the direction it did at the beginning of the maneuver but will move sideways through the air. This is a perfect method for capturing profile motion during a sporting event or of automobiles for example. Keep in mind that on most RTF-GPS drones, there is a roll-limiter that keeps the horizon level and the drone right-side-up. This limiter does not typically exist by default on freestyle and manually-piloted drones and too much roll input at once will cause the drone to do a 360-degree roll in whatever direction the input is given.
Combining these inputs during flight will result in a variety of different maneuvers from your drone. Increasing throttle and rolling right will create an upward roll maneuver, perfect for a reveal shot across a mountainous landscape. If you decrease throttle and pitch backwards you will create an interesting reverse dolly shot. The possibilities are vast!
You now have a better grasp on how drones move and what controller inputs are required to manipulate your drone to do what you want it to do. Now, let’s move on to your pre-flight checklist!
CREATING AND USING A PRE-FLIGHT CHECKLIST
It’s one of the most skipped steps in the world of drone piloting – going over your pre-flight checklist and routine and making sure you are fit for flight. This may seem trivial, but when so much liability rests on your shoulders as the Remote Pilot in Command (RPIC), every bit of risk mitigation is worth the time and aggravation. The list below is one that I have compiled after having flown as a hobbyist for 5 years and a commercial UAV pilot for 2 years – it is not officially endorsed by the Federal Aviation Administration (FAA):
Substance Ingestion Check
Have you consumed alcohol in the last hour?
Yes - Wait at least 8 hours before flying.
No - You are clear to fly.
Have you consumed marijuana in the last hour?
Yes - Wait at least 8 hours before flying.
No - You are clear to fly.
Have you consumed a controlled substance in the last hour?
Yes - Wait at least 8 hours before flying.
No - You are clear to fly.
Pilot Fitness/Readiness Check
Are you feeling tired or fatigued?
Yes - Do not fly until feeling has subsided.
No - You are clear to fly.
Are you having issues with blurred or double-vision?
Yes - Do not fly until vision is restored to normal.
No - You are clear to fly.
Are you suffering from muscular or joint pain that inhibits movement of the hands or fingers?
Yes - Do not fly until normal motion has been restored.
No - You are clear to fly.
Airspace Check/Clearances
Are you flying in a controlled airspace?
Yes - See next section below.
No - You are clear to fly.
Do you have proper clearances to fly in controlled airspace?
Yes - You are clear to fly.
No - Get proper clearances via LAANC or by contacting the FAA.
Are you flying at night?
Yes - See next section below.
No - You are clear to fly.
Is your aircraft equipped with FAA-approved strobe lights for nighttime operations?
Yes - You are clear to fly.
No - Please equip your aircraft with FAA-approved strobe light for safe nighttime operation.
Environment and Weather Check
Are there large crowds of people under your intended flight path?
Yes - See next section below.
No - You are clear to fly.
Do you have the appropriate safety equipment and clearances to fly over people?
Yes - You are clear to fly.
No - Please reference the FAA’s guideline for drone operations over people.
Are the weather conditions suitable for safe flight?
Yes - You are clear to fly.
No - See next section below.
Do the weather conditions make flight unsafe?
Yes - Do not conduct flight until weather conditions subside.
No - Proceed with caution.
Aircraft Readiness Check
Are all sets of propellers undamaged and in new or like-new condition?
Yes - You are clear to fly.
No - Please replace propellers unfit for flight.
Are all sets of propellers correctly installed and pointing in the right direction?
Yes - You are clear to fly.
No - Please ensure all propellers are installed correctly and facing in the right direction.
Is the aircraft fuselage free from cracks or damage that could be detrimental to flight?
Yes - You are clear to fly.
No - Please repair cracks and replace parts that could compromise flight.
Are the vision systems on the drone functional?
Yes - You are clear to fly.
No - Please troubleshoot and repair the vision systems before flight.
Are your batteries charged and free of damage?
Yes - You are clear to fly.
No - Please safely dispose of damaged batteries and charge batteries that are in good condition and require charging.
If you follow this checklist prior to your flight, you will mitigate many risks involved in the drone operation process and help to ensure the safety of you, surrounding people and structures, and your drone. Remember, even the best checklist is ineffective if the pilot is not safe, responsible, and sensible throughout the course of the flight.
LAUNCHING, OPERATING, AND LANDING YOUR DRONE
You understand the nuances of drone flight. You have your pre-flight checklist. Now there’s only one thing left to do – fly your drone! My recommendation for beginners is to find a wide-open space free of obstacles, people, traffic, and that falls under Class G Airspace. This will allow you the freedom and safety to fly your drone uninhibited up to 400 feet above ground level (AGL) without having to tap into your knowledge of the UAV rulebook every few moments.
Once you have your drone in an open area, put it on a flat surface, free of obstructions around the propellers. Remember, tall grass can get caught on the propellers on take-off and landing and cause malfunction of your drone’s motors or even damage to them. Steer clear of tall grass or plant life when taking off and landing.
After finding a clear, flat spot to launch your drone, reference your drone’s user manual to learn how to arm the motors. Conduct the arming sequence and once the motors are spinning, it’s time to launch the drone from the ground and begin the flight. Push up on your throttle stick to give your drone elevation. Most RTF-GPS drones require a GPS-lock before they can exceed a certain height and distance, so wait for your drone to notify you that the “homepoint” (which is used in return-to-home functions on your drone to bring the drone back to you automatically in the event of a dropped signal or low battery) has been set via GPS before going too far from the launch area. Once your drone has a GPS-lock, it’s time to explore the area around you from a bird’s eye view! Remember to reference Step 1 of this guide for the nuances of drone flight while your drone is in operation.
We won’t get into fine detail about the operation of your drone as all drones are a bit different and require different instructions while in-flight. However, I do want to take a moment to enlighten you on the rules for launching, operating, and landing your drone from specific areas. The only entity, as of the writing of this article, that has jurisdiction over your drone’s navigation of the national airspace is the FAA. However, if you are flying from private property, property that is communal and managed by a specific organization, or an area that has codes or laws against the launching, operating, and landing of drones, you must abide by those guidelines. If you find yourself in an area like this, simply articulate to the authority figure confronting you that you were not aware of the rules they had in place and that you will be happy to talk more with them when you land your drone. Land your drone as promptly as possible at this point.
On the flipside, if you are on publicly owned land with no codes or laws against the launching, operating, or landing of your drone and you are abiding by the rules and regulations put into place by the FAA, then you are not beholden to anyone to end your flight operation that is not directly associated to the FAA. State and local police do not have jurisdiction over drone operations nor do any Federal agencies outside of the FAA (and sometimes the Department of Defense in very rare cases).
Now that we have that out of the way, let’s talk about landing your drone. Much like launching, you will want to find an open area free of tall grass, brush, or other obstructive plant-life. The surface on which you land the drone should also be flat and ideally as level as possible. Bring your drone down slowly over your landing area and continue to push down on the throttle stick to decrease elevation. Once your drone touches the ground, you can either disarm the motors by using functions within your drone’s dedicated application or by conducting a disarming sequence that will be outlined in your drone’s user manual.
CONDUCTION OF BREAKDOWN AND POST-FLIGHT INSPECTIONS
You have successfully conducted a drone flight operation. Congratulations! That wasn’t so hard, was it? Now that your drone has safely returned to Mother Earth, it’s time to conduct your breakdown of your launch area and go over some post-flight inspections to ensure the longevity of your drone.
Remember to remove all launching/landing pads you might have set up for your drone from the area and pack them accordingly. Any payloads you might have had attached to your drone in excess of what came with it out-of-the-box should be accounted for and packed away. Remember to secure your drone’s camera gimbal (if applicable) and go over the fuselage and propellers on your drone to check for damage that could be problematic to future flights. If your drone has any damage to the fuselage, make note of it and mark it on the body of the drone with a marker or highlighter for later reference. Replace any damaged or broken propellers immediately to ensure nothing is overlooked in future flights. If there is no damage to your drone, pack it away appropriately in its dedicated case or bag.
You have completely wrapped up your operation and are now set to head home for the day. Well done!
IN CONCLUSION…
I hope you found this guide on “how to fly a drone for dummies” helpful to a more comprehensive understanding of UAV operations. While the title is a jest at the status of a beginner, I do not believe that if you have made it to this point in the article that you are a dummy. Use these guidelines as you see fit in your first and future drone operations. This information and methodology is tested and proven by commercial UAV pilots to be an effective guide for anyone wanting to fly these neat little machines safely and effectively.